Showing posts with label Guest Post. Show all posts

2011-10-20

{GUEST POST} Chef in Disguise: Hareeseh


I have promised you to introduce  my favourite blogs and bloggers on a monthly basis, and for my second guest post I couldn't think of anyone better than one of my dearest blogger friends Sawsan aka Chef in Disguise! She lives in Jordan, is an orthodontist by day, mother of two, and decribes herself as "a food explorer by night"!  I am a big fan of her recipes that are a perfect fusion of eastern and western cuisine, of her stunning photography, and not to forget- her beautiful writing style. It is a feast both for your tastebuds and for your eyes! To understand what I mean, if you do not know Chef in Disguise yet,  please visit  Chef in Disguise and start to explore- and don't forget to grab a cup of coffee or tea- I am sure you will stay long and will love it!!!  When Sawsan asked me what her guest post should be about, I told her I would be very happy to learn more about middle eastern dishes, no matter if savory or sweet.  Enjoy!

Ich habe ja versprochen, einmal im Monat meine liebsten Blogs und Blogger vorzustellen, und heute ist es wieder soweit! Mein Gast ist heute Sawsan von Chef in Disguise, eine meiner liebsten Foodie Freunde, Autorin des zauberhaften Food-Blogs "Chef in Disguise", den ich regelmäßig besuche und mitunter auch schon viele Rezepte nachgekocht habe. Alles was ich bisher ausprobiert habe, ist mir gelungen, und mein(e) Mitesser war(en) immer hellauf begeistert von den kreativen Rezepte-Variationen mit fernöstlichem Twist! Also, vorbeischauen lohnt sich, und ich empfehle dringendst eine große Tasse Kaffee oder Tee vorzubereiten, denn ich bin mir sicher, ihr werdet von den tollen Fotos sowie interessanten Posts gefesselt sein- wie ich!:) 

Sjećate se mog obećanja da jedanput mjesečno predstavim meni drage blogove i bloger(ic)e? Danas vam predstavljam Sawsan aka Chef in Disguise, koju pratim otkad je započela pisati svoj kulinarski blog, gdje redovno svraćam, uživam u prekrasnim slikama, u originalnim, detaljnim receptima s orijentalnim "twistom", od kojih sam mnoge isprobala i uvijek su mi savršeno ukusno ispali (u draftu čekaju recepti i sličice, ali ću neki drugi put o njima... :) I dragi to oduševljenje dijeli sa mnom! Inače, volim i njen način pisanja, da biste dobili jasniju sliku o čemu govorim obavezno posjetite Chef in Disguise, i uz obaveznu šalicu kafe ili čaja, sjedite, čitajte i uživajte!  


~o~o~o~o~


I was honored when Tanja asked me to write a guest post for her amazing blog. She is one of the most talented bloggers I have met. Her pictures are stunning, recipes original, styling mouth watering but above all she is kind and sweet, always there with a kind comment or words of encouragement just when you need them!

I wanted to share a middle eastern recipe with Tanja and her readers but which one? After some thinking and consulting my mum I came up with Hareeseh.


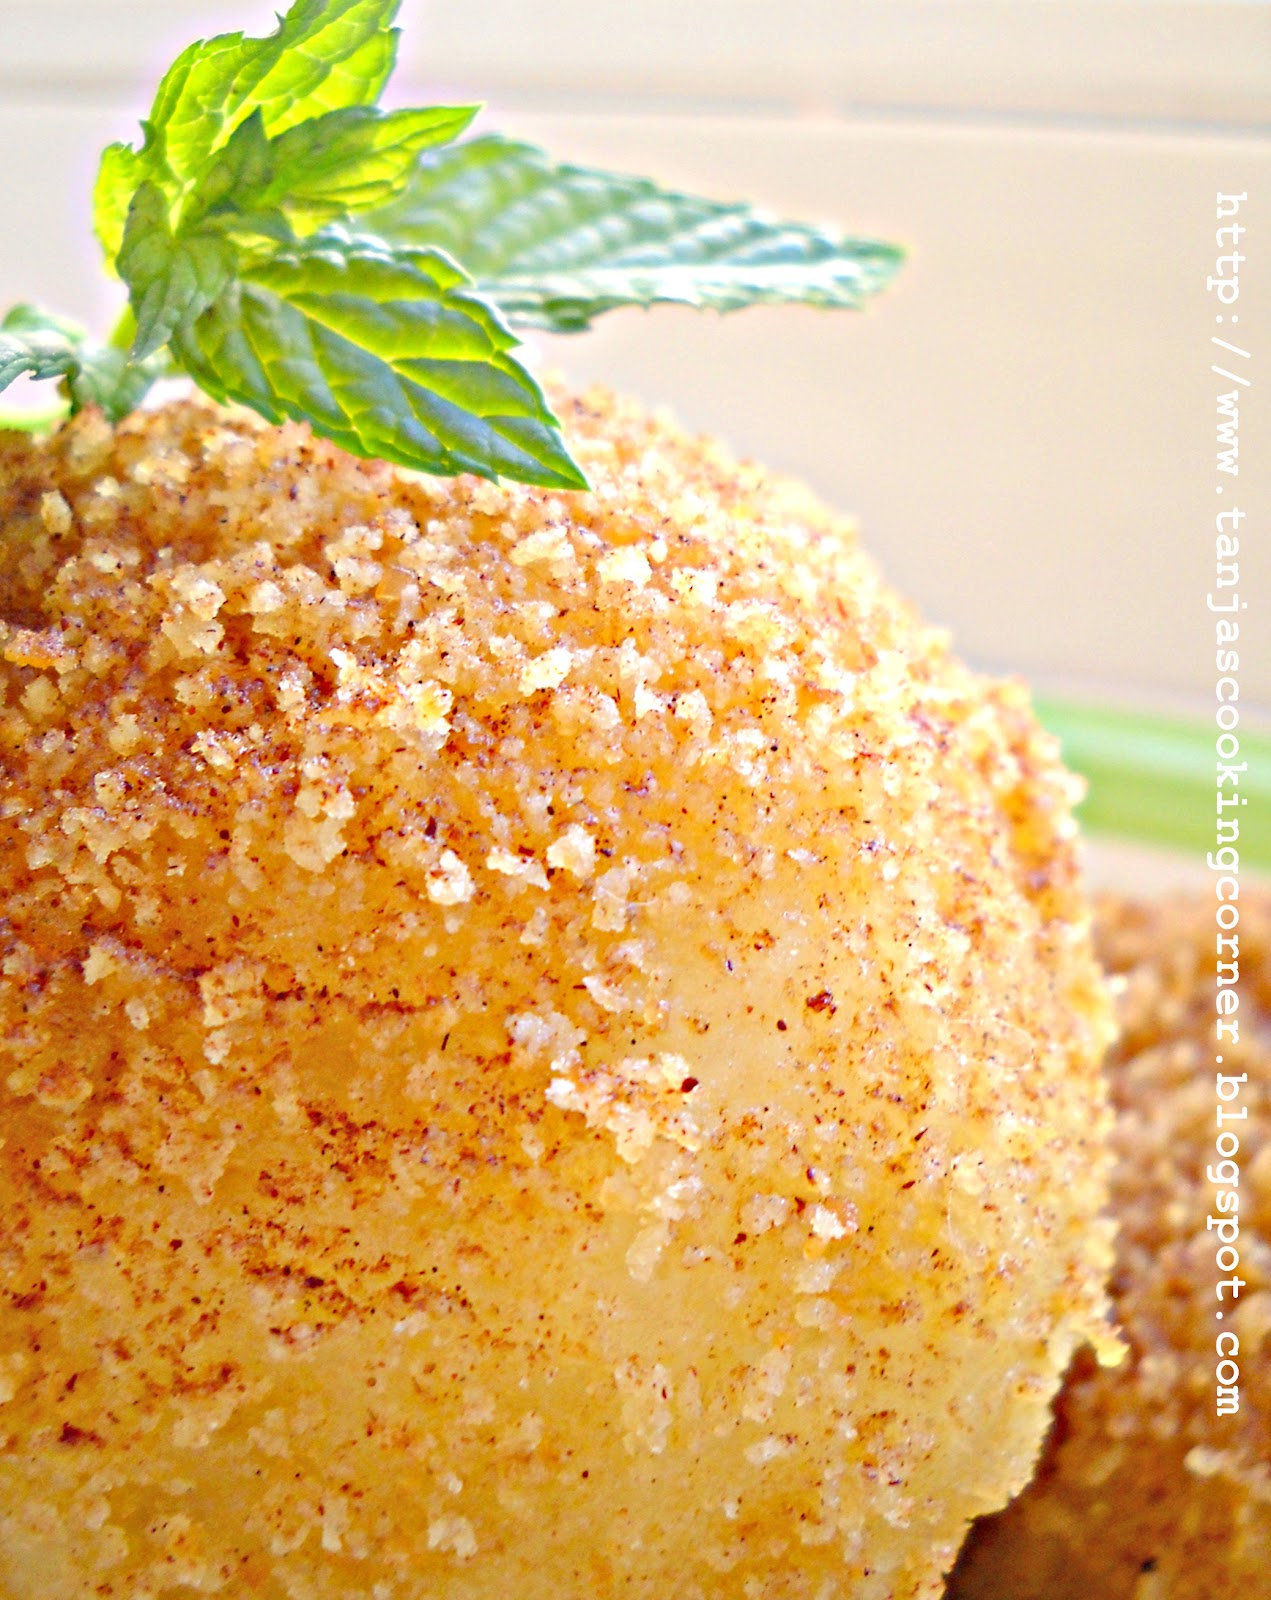
Hareeseh is an arabic dessert made with Samolina and sweetened with rosewater syrup. It is there in every dessert shop , family menu and it is even sold by street venders in the old parts of Amman and other middle eastern cities.
The recipes to hareeseh vary and so do the names. Some call it basboosa, namoora, harissa or haresse. Some use coconut, dates, yogurt or eggs while others stick to the basic semolina sugar and oil base. No matter what you call it or what combination of flavors you put in it, it is a treat worth making, a sure way to impress your guest and a quick and easy dessert that is loved by kids and adults alike
You can make hareeseh in a pan or using a cup cake try to get individualized desserts.


Hareeseh

2 cups semolina
1 cup (75 grams) shredded unsweetened coconut
1/2 cup (1 stick)(100 grams) butter
1 cup (240 grams) heavy cream
1/2 cup sugar
1 egg
1/4 cup (80 grams) greek yogurt
1/4 teaspoon baking powder
1/3 cup (80 grams) milk
1 teaspoon rosewater (optional)
1 teaspoon vanilla
zest of one orange or lemon (optional)

Syrup
3 cups sugar
2 cups water
1 teaspoon rose water
1 teaspoon lemon juice


To make the syrup

In a pot add the sugar, water and lemon juice
Bring to a boil over medium heat, allow to simmer for 2-4 minutes.
Take off the heat and stir in the rosewater


To make the Hareeseh

Mix all the ingredients in a bowl until well combined.
Brush your baking dish with oil or butter.
Pour the batter and then smooth the surface using a wet hand.
Using a sharp knife that you wet with water cut the pattern you like into the batter (here is a the way I did my pattern).


Bake in a 180 C oven on the lowest rack until the edges of the hareeseh are golden brown.
Place under the broiler until the top is golden brown.
Take out of the oven and allow to cool for 5 minutes.
Add the syrup to the hot hareeseh (the amount you add depends on how sweet you like it to be I usually add about half of the syrup).
Run your knife along the pattern you made to separate the hareeseh pieces.
Allow to cool to room temperature.
Decorate with pistachio.


~o~o~o~o~


Aren't these pictures simply mouthwatering?
Thank you Sawsan for writing this guest post and sharing this delicious treat with us!


For more yummie recipes visit Sawsan's blog.

You can connect with her here:


Have a wonderful day!!!


2011-09-15

Blueberry Sweet Pizza Tart with Sandra's Easy Cooking

Für deutsche Übersetzung bitte ausnahmsweise den "Translator" oben rechts nutzen!


Dear all, when I was beginning my food blogging adventure, I was not prepared to meet so many nice, warm-hearted and, above all, highly inspiring people. All of you, dear blogger and Foodie friends, are motivating me and are a source of inspiration for me every single day, and I want to thank you so much for that! My way of thanking you for making my days (and my table :D) more colorful and versatile by  sharing all of your wonderful recipe ideas, will be to feature-at least one- of my favourite blogs once a month! 

Today I would like to welcome Sandra from Sandra's Easy Cooking as my guest blogger and I couldn't be more excited to share her with you all! Sandra isn't only an extremely talented home chef, who is creating amazing meals in only 30 minutes, a full-time mommy of three, a great writer (she has published her first cookbook recently!), amazing photographer, she is also a real sweetheart! For those of you that don’t already know Sandra, I’m sure after today, you’ll have found a place (read: beautiful blog :D) where you will be stopping by regularly, and a good friend!


So without further ado, please welcome Sandra!


Hello Everybody,


I am so trilled to be here at Tanja's site. She is such a sweetheart, and dear person to me that I just couldn't refuse her invite to guest post! Tanja, you rock, and I am so happy to have opportunity to feature on your blog.
Let me introduce myself...My name is Sandra, host and author of Sandra's Easy Cooking. On my blog you can find simple, affordable meal ideas. My vision is to give a motivation, and meal ideas for busy mothers who cannot find time to cook meals for their family. But I think that there is always bit of spare time for cooking healthy balanced meals in probably 30 minutes. Also, I do more things at the same time, the so-called 'multitasking', this is always a big advantage if you want to cook fast food, but at the same time nutritional and healthy meal.
I am not professional chef, writer or photographer, but I found a passion in what I do and give my best to convert or transfer my vision into reality. Recipe that I want to share today is motivated by blueberries, a little unusual, but very nutritious and tasty.


BLUEBERRY SWEET PIZZA TART


INGREDIENTS:
 
For The Dough:

  • 2 cups All Purpose Flour
  • 1 cup Fresh Blueberries
  • ½ tsp. Salt
  • ½ Tbsp Baking Powder
  • 2 Tbsp Dry Yeast
  • 3 Tbsp Sugar
  • 1 cup Luke Warm Water plus ¼ cup for the yeast to get active (you can also use warm milk)
For The Topping:
  • 2 cups Blueberries ( you can also use Blueberry jam) 
  • 3 Tbsp Cream Cheese
  • 1 Tbsp Sugar
  • 1/2 cup Crushed Walnuts, optional*

DIRECTIONS:

1. Combine flour with blueberries, baking powder and salt
2. Add dry yeast and sugar to 1/4 cup luke warm water to activate.
3. When the yeast starts to bubble, mix in flour, baking powder, salt and blueberries.
4. Mix it very well adding about 2 more cups of luke warm water.
5. Make a dough, by mixing with a wooden spoon. Add more water if needed.
6. Let dough rise for 30 minutes at room temperature.
7. Preheat the oven to 375 degrees Fahrenheit (190° C).
8. Mix the dough few more times with a wooden spoon.
9. Transfer dough to the tart pan or any circle shaped pan.
10. Bake for 20 minutes or until golden brown.
11. Take crust out of the oven and let cool for 10 min., until warm but not hot.
12. Mix 3 tbsp cream cheese with 1 tbsp sugar and whip until creamy.
13. Spread cream cheese all over the crust.
14. Wash the blueberries and place on top of the sweet whipped cream cheese.  Add walnuts if desired.
15. Cut your sweet pizza and enjoy!


Dough can be made the night before--just mix then wrap in plastic wrap and place in the fridge. You can also bake this pizza with blueberries on top to make a wonderful pie. This makes a great breakfast treat too!
The taste is not for everybody, it is sweet but not too sweet. You can definitely taste the freshness of the blueberries. If you decide to bake it, which I tried that too, taste wise it is much better, but for the presentation and the whole look fresh blueberries look more appealing.

Thank you Tanja again so very much for letting me guest post on your blog today! I am so happy that I've been your first guest and honestly I am honored.

~o~o~o~

Pozdrav svima,
Tako sam presrećna sto sam ovde na Tanjinoj stranici! Ona mi je jako draga osoba tako da ja jednostavno nisam mogla odbiti njen poziv da joj budem gošća :) 
Dozvolite da se predstavim...Moje ime je Sandra, domaćica i autorica bloga


Sandra's Easy Cooking. Na mom blogu možete pronaći jednostavne, pristupačne obrok ideje. Moja vizija je da dam motivaciju i obrok ideje za zauzete majke koje ne mogu naći vremena da skuvaju obroke za svoju porodicu. Po mom mišljenju malo slobodnog vremena se uvijek može naći za kuvanje zdravih i uravnoteženih obroka u vjerojatno nekih 30 minuta. I ja također radim više stvari u isto vrijeme, takozvano 'multi-tasking', i to je uvijek velika prednost ako želite kuvati "brzu" hranu, a da se pri tome ne izgubi hranjivost i zdrav obrok.
Ja nisam niti profesionalna kuvarica, pisac ili fotograf, ali sam našla strast u ovom što radim i dajem sve od sebe da pretvorim i transformišem svoju viziju u realnost. Recept koji želim danas da podijelim sa Vama je motivisan borovnicama, malo je neobičan ali jako hranjiv i ukusan.


 SLATKA PIZZA/ TART SA BOROVNICAMA

SASTOJCI:
Za tijesto:

284g (šolja) brašna
225g svježih borovnica
1 čaša mlake vode + 1/4 čaše u kojoj se razmuti kvasac
28g suhog kvasca
42g šećera
7g soli
7g praška za pecivo

Za preljev:
454g borovnice
42g krem sira
14g šećera
225g oraha, isjeckanih

UPUTE:
1. Kombinirajte brašna s borovnicama, prašak za pecivo i sol
2. Dodati suvi kvasac i šećer u 1/4 šolje mlake vode (za aktiviranje).
3. Kada se kvasac počne dizati, umiješati u brašno, prašak za pecivo, sol i borovnice.
4. Izmiješati dobro uz dodavanje oko 2 više šoljice mlake vode.
5. Napravite tijesto, miješanjem sa drvenom kašikom. Dodajte još vode ako je potrebno.
6. Ostaviti tjesto da se diže 30 minuta na sobnoj temperaturi.
7. Zagrijte pećnicu na 190 stepeni Celzijusa.
8. Izmiješati tijesto još jednom sa drvenom kašikom.
9. Prebaciti tijesto u okruglu tepsiju, ili oblik koji vi želite.
10. Pecite 20 minuta ili dok ne dostigne zlatno smeđu boju.
11. Izvadite koru iz rerne i pustiti da se ohladi jedno 10 minuta, da bude topla, ali ne vruća kora.
12. Pomiješajte 3 kašike kremastog sira sa 1 kašikom šećera i mikserom miksati dok ne dobijete kremastu smjesu.
13. Premazati koru sa debljim slojem slatkog sira.
14. Operite borovnice i poredajte po premazu slatkog sira. Dodajte oraha po želji.
15. Isjeći u komade slatku pizzu! 

Prijatno!
Tijesto se može napraviti i noć prije:
Zamijesiti, neka tijesto nadođe jednom, a potom zamotajte u plastični celofan/foliju i staviti u frižider. Također možete ispeći ovu pizzu s borovnicama na vrhu nakon što ste ispekli koru, stavili sir i borovnice na koru, vratite pizzu u rernu jos 15 minuta, to bi sigurno bila odlična pita. Također ovo može biti fantastičan doručak!
Ova slatka pizza nije za svačiji ukus, istina je da je slatka, ali ne previše. Definitivno možete osjetiti svježe borovnice i ukus koje one dadnu, ali je jako neobično jer u većini slučajeva za ovakav recept se borovnice peku.
Ako se odlučite za ispeći ovu takozvanu pitu (što sam pokušala) daje predivan ukus, ali za prezentaciju i cijeli izgled svježe borovnice su više privlačne.


Hvala Tanja puno što si me pozvala da gostujem danas na tvom blogu.
Bila je moja čast da budem tvoj prvi gost!!!


   Thank you, Sandra, for Guest posting today and for sharing this lovely recipe with us! This Blueberry Sweet Pizza Tart looks amazing!
  It has been a great pleasure to have you here!

 
Hvala draga Sandra na divnom receptu i što si mi bila prva gošća na blogu!
Uživala sam, a vjerujem i da će uživati i ostali čitaoci ovog posta!!!


Make sure to check out Sandra's blog, 

you can follow her on Twitter,

like her on Facebook, or

friend her on StumbleUpon.


2011-07-06

Curd Cheese & Cinnamon Dumplings filled with Apricots- My Guest Post at Sandra's Easy Cooking

Before telling you more about the recipe I will post let me thank Sandra for the opportunity of being this month’s guest at her wonderful blog! I felt so honoured and so excited when Sandra contacted me and asked if I would like to be her next guest. Of course I would!!! I am a reading  Sandra’s blog for a while now, and her recipes and amazing photos trully inspire me every day! And so I started thinking what recipe I could post, it should be something I have not posted yet and as I like to make the absolute most of delicious seasonal fruit and vegetables at their very best, I have chosen to cook or bake something with apricots. When I decided what the basic ingredient should be, it came into my mind to make Dumplings filled with Apricots. These Dumplings are called Marillenknödel in Austria, where I live. It is a typical Austrian dish.
As to the cultural background of the Marillenknödel, I must briefly refer to Austrian history: In the imperial era Bohemia, which today belongs to the Czech Republic, was part of Austria. Since it was a poor country, many of its inhabitants went to Vienna to find work. Bohemian food was very much appreciated so that women easily found employment as cooks. Sweet dishes such as Guglhupf, Germknödel, Topfenstrudel, Powidltascherln and, of course, Marillenknödel belonged to their most famous specialities. Although originally food of the poor, Bohemian dishes very soon became an indispensable part of the Austrian cuisine and even Kings are said to have loved them :)

Für Rezept in Deutsch bitte scrollen:

And now back to the recipe:
Adapted from: Delicious Days
Preparation time: 30 minutes
Cooking: 12-15 minutes

Ingredients (for 6 dumplings):                                                   
250 g curd (20 %)
6 small apricots
4 tsp of brown sugar
1 tsp zest of (untreated) lemon
25 g soft butter
1 egg yolk
75 g semolina
 a pinch of salt
50 g all- purpose flour (type 405) + additional flour (for forming)
125 g butter
125 g breadcrumbs
powder sugar
cinnamon
Directions:

  1. Strain the curd cheese in a fine mesh sieve, for about 15-20 minutes. Wash the lemon, rub dry, then zest it with a grater. You will need about 1 teaspoon lemon zest.
  2. Wash the apricots and pad them dry, then cut  them open (only halfway!) along their seems. Remove their pits. Fill them with ½ teaspoon brown sugar.
  3. Bring a large pot of water to a boil, add a (generous) pinch of salt, then reduce the temperature until the water bubbles very lightly.
  4. In a big bowl cream together the strained curd cheese, semolina, egg yolk, butter (25 g), vanilla sugar, salt and lemon zest using a wooden spoon. Lastly add the flour and mix in only long enough until you can form the dough into a thick log (if the dough is still sticky add some additional flower).
  5. Cut the log into 6 equally sized slices.  Slightly flour your hands and form little discs, then place a sugar filled apricot on top of each and wrap it tightly with the dough.Form a dumpling (re-flour your hands if necessary) and check carefully that the apricots are completely covered by the dough.
  6.  Bring the pot of water to a boil and carefully slip the dumplings into the water, stir occasionally to make sure that the dumplings do not stuck to the bottom of the pot. Let them simmer at low  heat for 12 to 15 minutes.
  7. Meanwhile melt some butter in a pan over medium heat and roast the breadcrumbs (about 125g butter, and 125g breadcrumbs; ratio 1:1). Remove the dumplings with a skimmer, then roll them in the pan with the buttered breadcrumbs until evenly covered. Serve hot and finish with cinnamon sugar (just mix cinnamon and powder sugar). Enjoy!
Everyone, please stop by her wonderful blog Sandra’s Easy Cooking and check out my Guest post with interview :) and Sandra's fantastic recipes over there!
Also, you can follow her on:


Bevor ich euch mehr über das Rezept erzähle, möchte ich mich ganz herzlich bei der lieben Sandra für die liebe Einladung, Gast in ihrem wunderbaren Blog zu sein, bedanken! Ich fühlte mich sehr geehrt und war richtig aufgeregt, als Sandra mich kontaktiert und gefragt hat, ob ich nicht ein Guest Post für Ihren Blog schreiben würde. Aber selbstverständlich, sogar sehr gerne!!! Ich verfolge ja Sandra’s Blog schon eine ganze Weile, und ihre Rezepte und tolle Fotos inspirieren mich jeden Tag! Dieser Blog mauserte sich innerhalb kürzester Zeit zu einen meiner absoluten Lieblingsblogs, und Sandra zu einer ganz lieben Foodie Kollegin! Und so fing ich an darüber nachzudenken, was nun mein Rezept-Beitrag sein könnte…Es sollte etwas sein, das ich noch nicht gebloggt habe, und da Aprikosen/ Marillen ja derzeit absolut Saison haben, sollte es natürlich auf jeden Fall etwas mit Aprikosen werden J. Nun, da ich nun wusste,  was die Hauptzutat sein sollte, kam mir sofort eines meiner Lieblingsgerichte in den Sinn: Marillenknödel!  Ein typisch österreichisches Gericht, und da ich ja in Österreich lebe, wohl passend ;) Also, wenn ihr mögt, schaut doch mal bei Sandra in ihrer virtuellen Küche vorbei, und checkt dann  doch auch gleich mal  mein Guest Post !
In der Kaiserzeit Böhmen (heute: Tschechische Republik), war ein Teil von Österreich. Da es ein armes Land war, gingen viele seiner Bewohner nach Wien, um Arbeit zu finden. Böhmische  Gerichte waren hoch geschätzt, so daß böhmische Frauen sehr einfach eine Anstellung als Koch fanden. Süße Speisen wie Guglhupf, Germknödel, Topfenstrudel, Powidltascherln und natürlich gehörten auch Marillenknödel dazu, gehörten zu den berühmtesten Spezialitäten. Obwohl ursprünglich eine Speise der Armen, wurden böhmische Speisen sehr schnell zu einem unverzichtbaren Bestandteil der österreichischen Küche und sogar Könige sollen sie geliebt haben J

Und nun zum Rezept:

                   
                                             Klick auf das Bild zum Vergrössern


Also, wenn ihr mögt, schaut doch mal bei Sandra in ihrer virtuellen Küche vorbei, und checkt dann doch auch gleich mal  mein Guest Post (samt Interview :))!
Sandra findet ihr außerdem auch auf
Facebook und

Prije nego što pređem na recept, htjela  bih se zahvaliti dragoj Sandri s bloga Sandra's Easy Cooking za poziv da joj budem gošća na njenom, meni jako dragom blogu. Osjećala sam se jako počašćenom kada me je Sandra kontaktirala i pitala da li želim da joj budem gošća! Vrlo rado!!! Sandrin divni blog inače pratim već duže vrijeme, jer je pun divnih i nekompliciranih recepata, sa uvijek jako primamljivim fotografijama!
I tako sam počela razmišljati koji bi recept mogla postati, htjela sam da to bude nešto što još nisam objavila i nešto sa sezonskim voćem. Brzo sam se odlučila za marelice, koje su trenutno prekrasne, slatke i zamamne. A kad sam odabrala glavni sastojak, odmah su mi pale na pamet knedle J  Pošto živim u Austriji, a knedle s marelicama (Marillenknödel) se mogu smatrati tipičnim austrijskim specijalitetom, mi se moj izbor učinio prikladnim za prezentaciju na Sandrinom blogu.
Inače, slatka jela, kao što su Guglhupf,  Germknödel, TopfenstrudelPowidltascherln i, naravno, Marillenknödel su austrijski najpoznatiji specijaliteti. Nezamjenjivi su dio austrijske kuhinje! Ali da se vratim receptu:

Kliknite na recept:


Pogledajte/ pročitajte moj Guest blog OVDJE ( ima i mali intervju ;) i ujedno prolistajte Sandrin blog, sigurna sam da ćete uživati u njemu kao i ja :)

Sandru možete pronaći i na:


Related Posts Plugin for WordPress, Blogger...